If you have a Showit website and want to begin selling digital or physical products, you can easily add a shop using Shopify Lite!
Showit + Shopify Lite is a match made in e-commerce heaven. Your spiffy Showit website is the “face” of your shop, while the Shopify Lite “Buy Buttons” handle the shop’s transactions. These powerful embedded buttons take care of the entire checkout process—from the “add to cart” pop-up to the shopping cart itself.
Shopify Lite works best when your shop is on a smaller scale. Most designers recommend no more than 20–30 products max. While you can technically create as many “Buy Buttons” as you’d like, it gets a bit hard to keep up with all the different embed codes as the number of products get higher. (I’ve done it though, so it is possible!) If you have a hefty number of products, you might as well use a full-fledged Shopify website which is built for more robust e-commerce shops, or integrate a WordPress plugin like WooCommerce.
Adding “Buy Buttons” to your Showit website is delightfully simple; but there is some prep work that must be done in advance. So before you race over to add a shop to your Showit website, I recommend getting organized!
Note: This is a run-down of how I add online shops to Showit websites, but it’s by no means the complete user manual. See Can I sell products with Shopify? for Showit’s walk-through, which includes a few very important “need to know” items about the integration.
Step 1 | Map Out Your Shop Pages
Before you begin designing the look of your shop, start by mapping out the pages. Here’s a checklist of some questions to consider:
- What does your Shop’s main “home page” include?
- Do you have stand-alone products or are you going to organize them into collections and/or categories?
- What information will be included on your product pages?
- Will you want a secondary navigation for your shop pages?
- Will you have a page for your shipping or return/exchange policies, or a shop disclaimer?
Think through the overall structure and navigation of your shop pages, as well as how to integrate them onto your existing website, before diving into the actual creation phase. Prep work makes the dream work! Or something like that.

Step 2 | Compile Your Product Photos + Details
Now’s the time to map out the specific details for each of your products—be they physical or digital. Here’s a quick checklist that I give my clients:
- Product Title
-
-
- What is the name of each product? Does it fit into a larger collection or category, or does it stand on its own?
-
- Product Price
-
-
- What is the product price (before tax, if applicable)?
- Are there price variations or just one flat fee? (Shopify Lite allows you to add variants to your products, so a customer can toggle a dropdown menu to choose which one they want.)
-
- Product Descriptions
-
-
- Write a blurb detailing exactly what the product is/does/includes. Consider leading with a benefit statement – why should someone purchase this product?
-
- Product Photos
-
-
- High-quality, professional product photography is a non-negotiable! Make sure the photos clearly show off the product from different angles.
- If the product is digital, consider using mockups to show how it would look on paper, a tablet, a computer screen, etc.
-
- Product Weight/Dimensions
-
-
- This comes into play for shipping physical products. You’ll need to know the weight of each product, and depending on what shipping options you decide upon in Shopify, you may need to know the dimensions of the box you’ll be shipping the products in.
-
- Product Inventory
-
-
- How many units (or downloads) of each product is available?
-
- Digital Download Delivery
-
-
- If you’re selling digital products, how will the download be delivered? (Shopify Lite has a digital download app available, but you’re not obligated to use it.)
-
- Any Shop Policies and/or Disclaimers
-
-
- What is your shop’s return or exchange policy?
- Are there any other policies, like minimum purchase requirements?
-
- Shipping, Pickup, and/or Delivery Details
-
-
- Decide if you’re going to offer domestic shipping, international shipping, pickup, and/or delivery. There are many different shipping options in Shopify you’ll want to review and choose from.
- If you offer delivery, what is the delivery radius? Is there a delivery fee?
- If you offer pickup, what is your pickup location’s address? What are the pickup hours?
-
- Taxes or any other fees where applicable
-
- Normally for physical products, but check your particular state’s sales tax rates to be sure.
Step 3 | Sign Up For Shopify Lite
One of my favorite things about Shopify Lite is the price tag: It’s only $9/month! It’s potentially a huge return on your investment. I also find it to be pretty user-friendly, with lots of video tutorials and articles to guide you.
Upon signup, you'll need to set up your account. This may include adding your address if you have a brick-and-mortar location, plugging in your tax settings, and setting up how you want to get paid. Once your basic information is entered, you can begin adding products!
Step 4 | Add Your Products In Shopify Lite
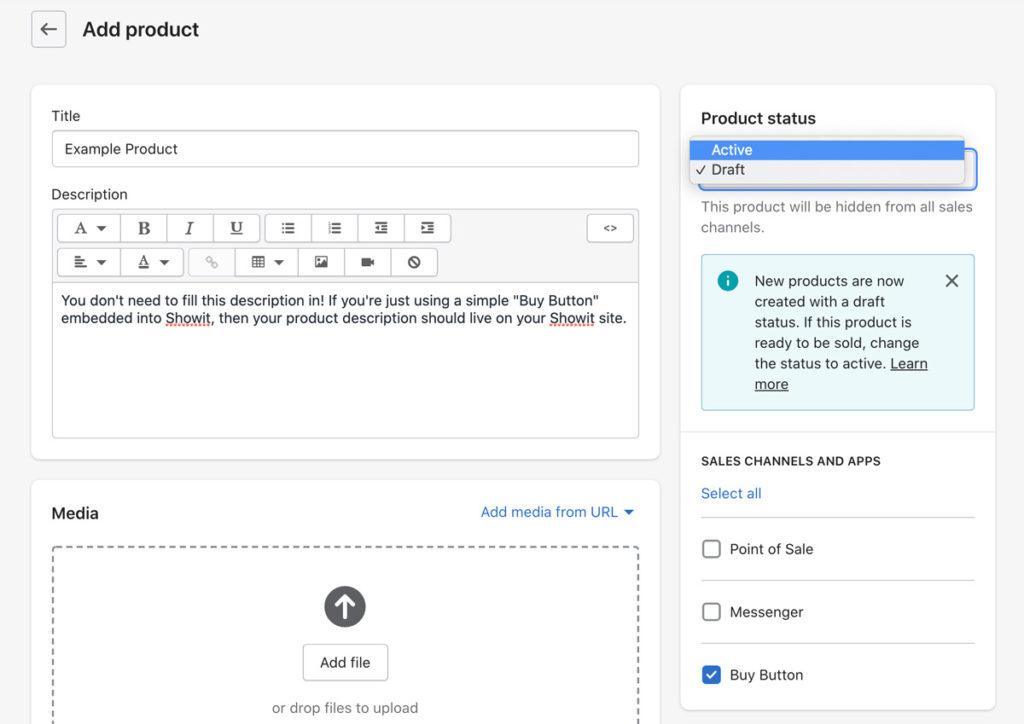
From your Shopify dashboard, go to Products > All products then click the green "Add Product" button. Shopify allows you to enter the title, description, and price of the product, as well as adding any variant like different sizes or colors. You can add the amount of inventory, and even attach the product to a certain collection so it's conveniently grouped with other like items.
Make sure the "Buy Button" checkmark is enabled under Sales Channels and Apps and set the Product status to "Active". Repeat this step for all of your products...then go on to create your Buy Buttons!
Step 5 | Create Buy Buttons In Shopify Lite
After all your products have been entered, you'll create a Buy Button for each product.
From your Shopify dashboard, go to Buy Button and click "Create a Buy Button". Go to “Product Buy Button”, and then select the corresponding product from the list.
Shopify Lite allows you to customize the Buy Button to match your website. You can plug in a hex code to make it a specific color, choose from a list of fonts for the button text, and adjust the corners and width. You can also specify the click action: Does it add this product to the cart, open product details, or take someone directly to the checkout?
Once you’re happy with the look and functionality of your Buy Button, click “Next” and then “Copy Code”. This code is what you’ll embed into the corresponding product page on your Showit website.
Step 6 | Embed Buy Buttons On Your Showit website
Now here’s where the magic happens! Once you have a product’s Buy Button embed code copied, shimmy on over to the backend of your Showit site.
Click the object menu in the middle of Showit's bottom menu bar, and click "Embed Code''. Put the gray embed code box where you want the button to appear on the page. Click the "Custom Code" box in the Embed Info panel on the right, and then paste your embed code into the "Update Custom Code" box that pops up. Hit “Save” and there it is! You should see your beautiful button appear. Adjust the embed code box as needed to fit around the button, always double-checking that things are looking fab on both the desktop and mobile layouts.
Pro Tip for Buy Buttons:
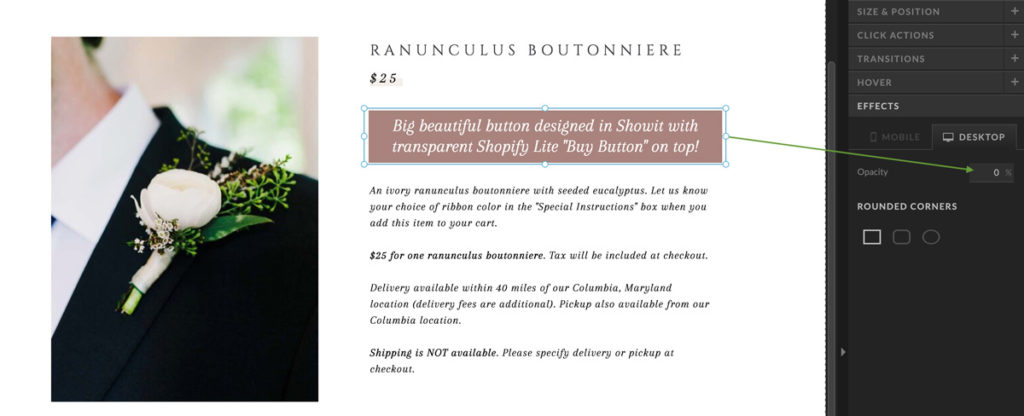
The styling options in Shopify Lite aren't as customizable as they are in Showit. For example, you can't make the button wider than 100px and you can't upload a custom font for the button text. However, as a workaround you can create a super simple Buy Button in Shopify, and create the fully-styled button in Showit.
When it comes time to embed the Buy Button into Showit, you would overlay the embed box on top of your already-styled-in-Showit button. Plug in the embed code from Shopify Lite into the box, but then set the embed code box's “Effects” settings to 0% opacity in Showit. You'll still get the functionality of Shopify Lite's Buy Button, but with the pretty look of a Showit-designed button.
◆
Want to see Shopify Lite in action on a Showit website?
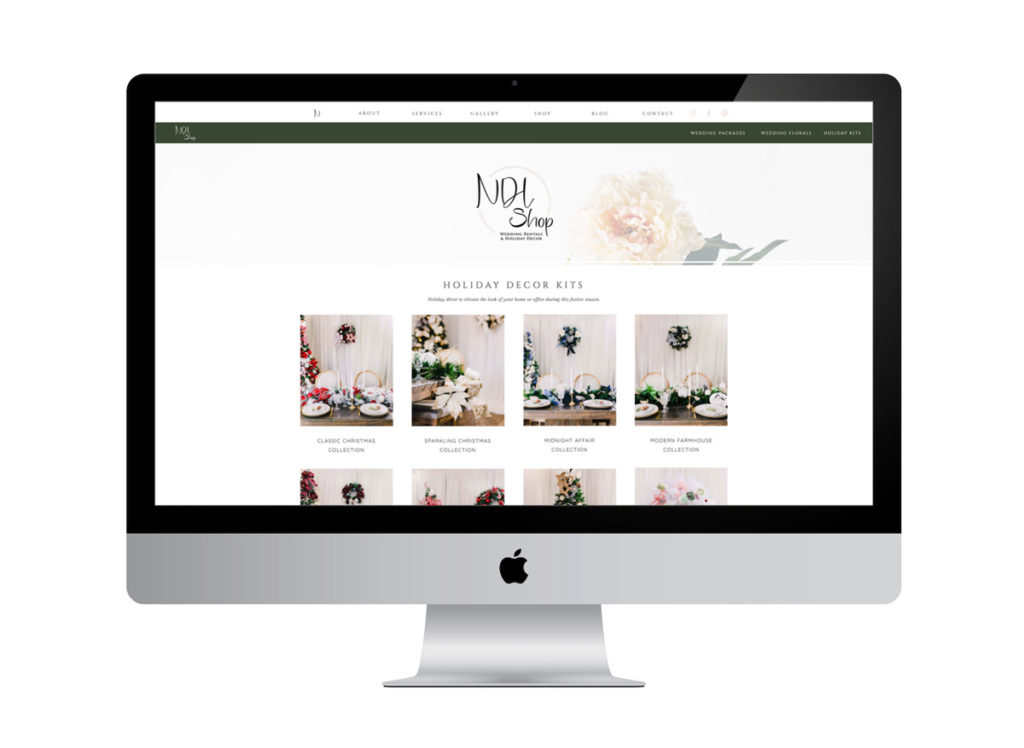
I recently launched a shop for one of my custom website clients, Nadine De Leon Designs. She wanted an online storefront where she could sell wedding florals, wedding decor packages for intimate events, and holiday décor kits. These products could be delivered, shipped, or picked up at her Columbia, Maryland location.
Our project started out with the “20–30 products” plan..but we ended up closer to 45 total products. It’s a good example of a more robust shop built entirely on Showit with embedded Shopify Lite Buy Buttons.
